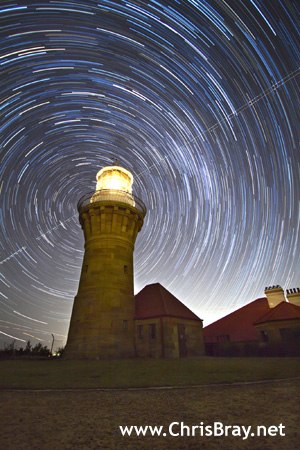
Star Trail Photography
 |
Tutorial by Chris Bray |
They look awesome and they're easy - all you need is a clear night, a tripod, a rubber band and a pencil - oh, and a bit of insomnia helps too! Here's how I do it - step by step - including stuff like focusing, working out the settings, using bulb-mode without a fancy plug-in timer, finding the south celestial pole for those spiral star shots, and even a comparison between doing one long exposure (say 1hr) vs stacking heaps of shorter ones (maybe 120 shots, each 30 secs long)!
This tips article has become quite popular! If you like it too, please help it reach even more people by clicking the Google+ and Facebook 'Like' buttons here:
1) Fully charge up your camera!
There's nothing worse than getting half way through an agonisingly slow star photo to then have your camera battery die. These star shots draw a fair bit of power, especially if you're trying for the 'take heaps of photos and stack them together later' approach, which does look better, but takes more effort.
2) Picking your location:
You really can try this anywhere, but you'll find that if you're too close to town, then the 'light pollution' that emanates from civilisation makes it harder to see the stars, so rather than being nice and black, the background to your stars will become a pale haze instead, and this also means you won't be able to take as long a photo (ie such long trails) before it becomes completely washed out. The moon too adds significant light pollution so shooting during a 'new moon' (no moon) is ideal, or when the moon has set below the horizon, or at the very least, is well out of shot (and won't move in!). Of course you need a clear, cloudless night, and ideally a dry (not humid) night too, else condensation may form on your lens (some people literally wrap those little hand-warmers around the lens to keep it warm to prevent this). Also it's best to shoot from somewhere where there's less chance of a car, a torch-wielding person, or even a plane accidentally ruining your shot. Another point to consider when picking your location is what to have in your foreground. I think the best star trail shots are ones with something interesting framing up the foreground, so perhaps near some impressive trees and an old shed or something. Don't let all these ideals dissuade you though, you can still have fun and get some pretty cool shots in your backyard, in town.
3) Snap on your favourite wide-angle lens.
The wider the better as you'll get more stars! In fact, fish-eye lenses look pretty cool for star trail shots! In terms of how 'fast' a lens to use (ie how small an f/# it can reach), it's nice to have a fast one, as stars are pretty faint, and the smaller the f/# you use (the larger the aperture hole and thus the better the light gathering ability of the lens) the brighter your stars can be. This is particularly valuable when doing the 'take lots of photos and stack them together later' technique as you'll see later.
4) Focusing:
Before you get tangled atop tripods, get your focus sorted first. Yes you usually can actually Auto Focus (AF) at night, providing you accurately point at a star that's bright enough, or at something like the moon, or failing these, on a point light source on the horizon somewhere - its all about the same distance away as far as your camera's concerned. It helps to set your camera to use only its centre auto-focus point so you can precisely select what to focus on. After it's managed to *beep* and latch onto something with AF, then take your finger off, find the Manual Focus (MF) switch (usually on the side of your lens) and switch your lens to MF and then you're good to go - now just remember not to bump that autofocus ring (or the zoom ring either as on some lenses changing zoom affects focus, so it might be best to set how wide you want to zoom first).
If you really can't get AF to latch onto anything, then switch it to MF and if your lens has a physical display/ruler showing the focus distance then rotate your focus-ring until it's set it to the infinity mark, or if it doesn't have one then fine, go and squint through your camera at the night sky and rotate your focus ring back an forth until the stars look as sharp as you can. Good luck with that. While we're messing about with the lens, now's also a good time to turn lens stabilising OFF if you have it (unusual on a wide lens anyway) because it'll chew through your batteries on a long star photo!
5) Tripod:
Mount your camera on your tripod. Yes, you really do need one. It's pretty critical that your came doesn't move or shift it's location AT ALL during the shot(s). Use a good solid tripod, maybe even weight it down with rocks on the legs if it's at all windy or spongy ground.
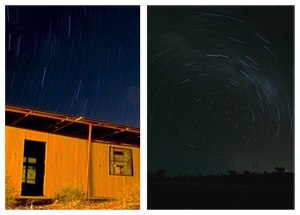
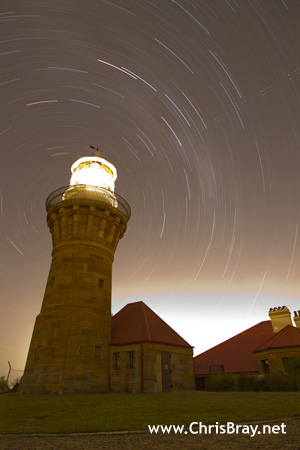
6) Star lines or star circles?
You've got a choice here - depending on where in the sky you point your camera, you can either have the stars seem to streak past the sky, or you can have them appear to swirl around in a circle. If you want maximum star trail length in the shortest amount of time, then you'll want to point your camera either vaguely East or West and you'll get basically straight line paths, because looking due South, the stars will appear to circle (much more slowly) around the point that is the South celestial pole (the North celestial pole is over the horizon in Australia). Right at the centre of this celestial pole, the stars don't appear to move at all. You get the idea, it's up to you. If you do want to aim for the star circle shot - and they do look pretty cool - you can
work out where this 'south celestial pole' is quite easily. (Basically, just extend the Southern Cross down along it's axis by about 4.5 x it's length).
7) Framing it up:
As mentioned above, I think it's nice to include some ground/trees/structures in the foreground of your shot rather than just stars, so think about that. Remember your rule of thirds and any other composition rules that you feel apply. I sometimes find it handy to ask a friend to wave a torch around on the scene so that while looking through the viewfinder I can at least vaguely what's in shot.
Now, we have a choice to make...
Take one long exposure, or lots of shorter ones and stack them together later?
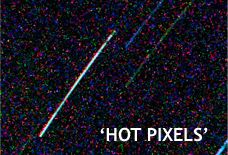
Tricky question, and different people swear by different methods. Basically, taking one long exposure is a hell of a lot easier to do, but has some significant drawbacks. The problem is that the camera's sensor is just like any other electrical device, and it gets hot if you leave it running for too long, and this heat creates an ever increasing amount of random speckles of colour/light to register throughout your image, called 'hot pixels' (the effect looks similar to ISO noise). This means that for lengthy exposures, the longer the shot is, the lower quality it will be. Taking lots of shorter photos instead (and we can get the camera to do this for us), alleviates this problem.
The second advantage of combining a series of shorter photos is that it lets the stars appear much brighter: This is basically because during a long, slow exposure where the camera's collected just enough light such that the surrounding scene bas become correctly exposed
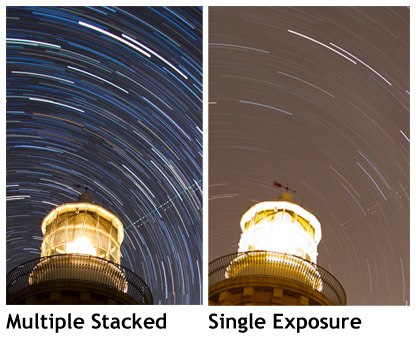
(and any 'light pollution' not yet bright enough to be problematic), the accumulated brightness of any given star is actually spread out / divided along it's whole path, whereas if the star had stayed in the same location that whole time (as it appears to when the overall light collection is accelerated into a shorter photo), it's gathered brightness just compounds in the one spot making it brighter and brighter. So in the series of shorter photos - each perhaps 30 seconds long - in every shot you can collect enough total light that the surroundings have become correctly (maximally) exposed, while the stars have barely moved anywhere, making them quite bright. When combining these photos later on, the software only adds-in the light from each additional photo to those areas that are not already bright - ie it doesn't make the already 'correctly exposed' foreground scene become increasingly brighter (thus overexposed), but as the intense little stars lights are in a slightly different place in each shot, they add together into one bright, long trail.

There are other benefits of going with this 'series of shorter photos' approach too, including that if a plane flies past during the shoot (or someone accidentally blinds the camera with a torch) you can simply remove that scarred shot from the set and you'll hardly notice in the final composition, whereas if it was all one long photo then there's nothing you can do - the whole thing is likely ruined. Taking a series also means apart from stitching them all into one image, you can also get programs to convert them frame by frame into a rather striking time-lapse style video and watch the stars whirl past.
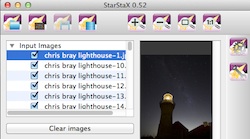
There is a very cool FREE PROGRAM (for both Mac and PC) called '
StarStaX' which makes combining your images dead easy. There is also a great free script written by 'Russell Brown' called '
Stack-a-Matic' that you can link into Photoshop CS5/6 to do this too. This is a good little video on YouTube showing how to stack the images using both the StarStaX program and the Stack-a-Matic script.
So yes, there are a lot of advantages to going the multiple-shot approach, but like I said it's a lot more work, and you certainly can get some stunning star-trails using the traditional one-long-shot too, so don't worry! Whatever sounds like more fun to you.
If you're going with ONE LONG EXPOSURE:
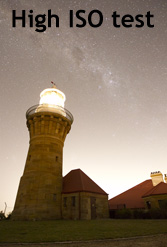
8) Take some test shots:
Now, rather than endure a lengthy 30+ minute star photo to then find out that a) your horizon's wonky, b) your surrounds are too over exposed, and c) that your framing / composition's boring, I like to do a few quick test shots to see how it's all going to look! These test photos also give us a starting point to calculate how long you'll want to leave your shutter open for on the real photo, what ISO to use etc.
In order for these test shots not to take forever, crank your ISO right up as high as your camera can go (yes, all the way!). I'd start in Aperture mode (Av mode for Canon, A for most other brands) and scroll your aperture to the smallest f/# (largest hole, therefore quickest photo) but ideally using one of the standard f-stop values [f/1.4, f/2, f/2.8, f/4, f/5.6, f/8, f/11, f/16, f/22, f/32, f/45 etc] as this'll make it easier for our calculations later on.
Next, assuming you're using the default 'Evaluative Metering', set your Exposure Compensation (EC) down a bit (say minus 1 or 2 perhaps, as you want a dark-ish photo) and then go ahead and take a shot. Hopefully it'll be less than a minute long and you can check the results and adjust both your composition and your exposure compensation to get whatever overall results look pleasing to you. Your final photo will look the same as this, only the stars will have slid across the photo - the framing and surroundings should stay pretty much identical to how you set them now with your EC. Note that in the final photo the stars will be fainter though, because as mentioned before, their total intensity will then be spread across their whole path, rather than accumulating in one point as they did in this test shot.
9) Calculations:
Now for the interesting bit. Note down the f/#, ISO and subsequent shutter speed used on the test photo you've selected, and we're simply going to scale-up that shutter speed to however long you'd like your star trail photo to be. Half an hour to an hour gives pretty good results, but depending upon your insomnia, feel free to try as long as you wish. The idea is that we now reduce our ISO and secondly, increase our f/#'s, both of which have the net effect of allowing you to extend the shutter speed yet result in the same original exposure overall. The key is to realize that every time you halve your ISO, you're making your sensor half as sensitive to light, so you get to double your shutter speed each time! It's a similar deal for your f/#. So long as you stick to the above scale of standard 'one-stop' increments' then each higher f-stop is actually constricting the lens aperture opening to half it's area, meaning it collects only half as much light, therefore again allowing us to double the shutter speed yet result in the same overall exposure. So in this way, repeatedly halve your ISO value (just in your head, it's not hard) until you get down to a nice non-grainy value, ideally even ISO 100, all the while doubling and re-doubling that original shutter speed, making it slower and slower. If you're not yet getting a long enough shutter speed for your shot, then we next do the same with your f#'s: Start cranking them up one complete stop at a time (doubling the shutter speed as you go), until finally your calculated shutter speed is long enough for your dream star trail shot.

10) Switch to Bulb Mode:
Switch your camera into 'BULB mode' - this is the mode that lets us take longer photos than the 30-sec limit imposed by the camera normally. If you don't have a dedicated 'Bulb' or 'B' mode on your camera, fear not, it'll be inside your Manual 'M' mode - if you scroll your shutter speeds long enough it'll display 20" then 30" and then go one more, and it'll say 'Bulb'. In 'Bulb' mode, you can select whatever f/# you want, and the shutter speed is determined by how long you hold down the shutter button.
11) Enter the settings:
Almost done - now just dial in your calculated f/# and ISO from before and set your alarm clock to wake you up at the end of your desired shutter speed. If you have the patience, you could now also turn on 'long exposure noise reduction' in your camera's custom functions if it has it, but be warned the camera will then have to wait and process the photo for the entire length of shutter speed again when the photo's finished, in it's attempt to capture, compare and then cancel out some of that noisy 'hot-pixel' grain, but even still, it'll likely to be quite a noisy shot.
12) Plug in your cable release / timer:
This is the thing that lets you take 'Bulb' photos without having to actually hold your finger on the shutter button for the entire duration of the photo! What's that? You don't have a cable release? All is not lost, just grab a rubber band and stretch that around your camera body passing over the shutter button, and wedge a pencil or even a stick on top of the shutter button to keep it pressed in! Easy! Your camera's now taking the photo for you!
13) Wait.
And ideally, stand guard near your camera to ward off anyone wandering along with a torch that may inadvertently flash their beam into your camera, blinding your photo. This usually happens in the last few minutes. If something unavoidable is approaching, like a car, you can briefly hold something in front of the lens to shield it until it's gone and it might still be ok.
14) Done!
Marvel at your amazing star trail photo! Resist the urge to take another, and go to bed, else you'll miss the sunrise tomorrow! Now is a good time to laugh at anyone beside you who opted for the series of shorter photos instead, as they now have to go and process them all on the computer to create their image! Haha!
If you're going with A SERIES OF SHORTER PHOTOS to combine later:
9) How long should each photo be?
It can be whatever you like, but 30 seconds is about right and also very convenient because then you don't even need any fancy timers / remotes! You can just switch your camera to 'Tv Mode' (Time Value mode on a Canon, or 'S' mode on other brands) and dial the shutter speed out to the maximum, which is 30 seconds (looks like 30" on the display), and switch the cameras 'Drive Mode' to 'continuous shooting' (where the camera takes as many photos as it can, one after the other, until you lift your finger off the shutter button). Now (after you've set up the exposure as detailed below) if you simply get a rubber band and stretch it around the camera passing over the shutter button, and then get a pencil or a stick or something to wedge the shutter button firmly in, then you're laughing - the camera will now take an endless series of 30 second photos until you wander back and pull out the pen at the end of your desired star trail time. Easy!
If you do have a fancy timer remote then you can plug that in and press and lock it's 'shutter button' to the 'permanently on' position, and you'll get the same result, while looking much more professional.
10) Setting up the shot:
As mentioned above, it's easiest to be in 'Tv' mode (aka 'S' mode), with your shutter speed scrolled out to 30 seconds (displayed as 30"). Before you commence your series of shots, you'll want to take a few test photos first to ensure that you've got your framing right, your shot horizontal, and your overall brightness / exposure set aesthetically.
Start with your ISO down nice and low like ISO 100 to give us nice noise-free images, and perhaps start with your Exposure Compensation (EC, aka '+/- brightness') set down a notch or two to -1 or -2 (because we want a fairly dark-ish scene overall), and take a test photo and see what you think, adjusting the EC brighter or darker as you wish. If, when you touch the shutter button, the camera starts flashing the f/# at you then it's basically saying there's not enough light out there to take a photo at your requested brightness in 30 seconds, and so what you do then is gradually increase your ISO (hopefully not too high) to make your camera more sensitive to the light, until it stops flashing/complaining at you, allowing you to get the image looking the way you want it. This is the advantage of using a 'fast' lens, as you won't need to turn your ISO up so high to get a nice bright shot even in low light.
11) Fire away!
It might be a good idea to format your memory card now before you commence taking the real series of photos, just so that you don't accidentally include any of the wonky test photos in your final compilation. Once done, you're all set - go for it! Wedge that pencil in to hold the shutter button down (or use the remote timer if you have one) to commence the series. Set your alarm clock to wake you back up when your desired star trail time is finished, and that's it. You're free.... Until it's time to compile all these photos of course. *groan*
12) Stacking the photos together:
Now, I'm no master at doing this, and it seems you can get as involved and confused as you want, and buy as expensive a software to do it as you like. But as I said earlier, I did it very easily and was very happy with the results just using the free FREE PROGRAM (for both Mac and PC) called '
StarStaX' and also using the great free script written by 'Russell Brown' called '
Stack-a-Matic' that you can link into Photoshop CS5/6 to do the same thing. This is a
good little video on YouTube showing how to stack the images using both the StarStaX program and the Stack-a-Matic script.
This stack and blend approach also opens up some even more creative options like including a photo in the series in which you perhaps 'painted -in' bits of the foreground with a torch, or even a photo taken from the exact same location earlier on at sunset, giving some amazing colours to the background sky. I've seen some
absolutely stunning results, and you can
see some of them here by Lincoln Harrison.
Did you find this tutorial helpful?
If so, please click the 'G+' and Facebook 'Like' buttons below to help others find it, then enjoy other free tutorials here.
Thanks!
FREE Photography Course!

2 MILLION VIEWS and growing! Learn everything from composition & exposure to aperture, ISO and more in my 10 easy course videos!
Watch Videos ▶